Updated 11 November 2007 with updated links
To use Diorama Studio, Konami’s free Busou Shinki digital diorama software, you’ll have to install the ShinkiNET application suite, create a Konami ID and (optionally) configure Windows XP to display Japanese text correctly.
In previous entries, I’ve detailed the steps needed to create a Konami ID and display Japanese text correctly in both the ShinkiNET Launcher and Diorama Studio on a non-Japanese edition of Windows XP.
I will now go through the process of installing the ShinkiNET application suite and launching Diorama Studio through the ShinkiNET Launcher.
System requirements
Before you download the installer, you ought to check whether your system meets the requirements for the ShinkiNET applications.
OS
Windows 2000/XP/Vista (Japanese edition)
CPU
Minimum: Pentium III/800MHz or better
Recommended: Pentium 4 2.8GHz or better
RAM
Minimum: 256MB (Vista requires 512MB)
Recommended: 1GB or more
Hard disk space
2GB
Display
Minimum: 640×480 resolution
Recommended: 1024×768 resolution or better
Video card
Minimum: Nvidia GeForce2 MX200 or equivalent
Recommended: Nvidia GeForce 6600 or better
Display driver
DirectX 9.0c-compatible.
Video Memory
Minimum: 32MB.
Recommended: 128MB or more.
Soundcard
DirectX 9.0c-compatible driver.
DirectX version
DirectX 9.0c.
Internet connection
Broadband.
Notes:
The system requirements are rather modest and Diorama Studio ran just fine on my old Athlon XP 2500+ with 512MB RAM and a 128MB GeForce4 Ti 4200 video card. However, setting the graphics quality at the High setting resulted in noticeable graphical errors. Once I updated to a system equipped with a GeForce 8600GT graphics card, I could run the software at the highest setting without problems.
Contrary to the stated requirements, the ShinkiNET applications run perfectly well on non-Japanese editions of Windows XP. You will have to configure Windows XP in order for Japanese fonts to display correctly, however.
ShinkiNET application suite takes up 2GB of hard disk space once installed. My Busou Shinki folder (excluding the screenshots folder) is currently 2.4GB in size. Individual screenshots, which are stored in JPEG format, range in size from 58KB to 489KB.
Downloading and installation
The ShinkiNET Launcher, Diorama Studio and Battle Rondo share a single installer and you cannot install those individual programs separately.
The shinkinet_setup.exe may be found here. The installer is 733MB in size but the download rates from Konami’s servers are excellent. I was consistently getting 100KB/s on my 1Mbps DSL connection and it took me less than 3 hours to download it completely.
You must have a Windows XP computer administrator user account in order to install the software. Installing the software is straightforward even if you haven’t configured your system to display Japanese text correctly.
Once the installation is complete, there should be a ShinkiNET Launcher icon your desktop.
Uninstalling
You cannot uninstall individual applications of the ShinkiNET suite. It’s all or nothing.
Uninstalling the ShinkiNET application will not delete your screenshot folder, saved poses and saved dioramas stored on your hard disk. You should be able to reload saved poses and saved dioramas after reinstalling the ShinkiNET application suite.
In addition to that, your server-side data is not affected when you uninstall the ShinkiNET application suite and your access codes will still be associated with your Konami ID.
However, deleting your Konami ID will also delete all your server-side records associated with that ID and this includes access codes for models and parts.
ShinkiNET Launcher
Upon executing the ShinkiNET Launcher, the program will automatically look for and download updates.
You should see this screen eventually:
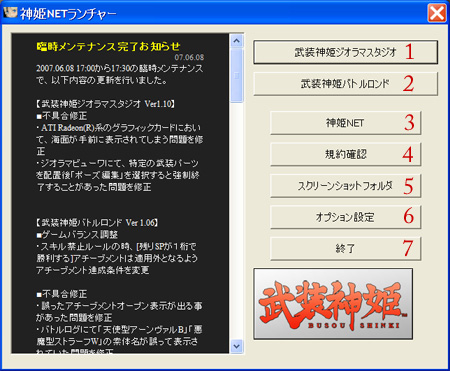
Let’s take a look at the options one by one.
1. Diorama Studio: Launches Diorama Studio after checking for updates.
2. Battle Rondo: Launches Battle Rondo after checking for updates.
3. ShinkiNET: Opens the official site in the default browser.
4. Terms and Policies: Opens this page in the default browser with links to legalese, usage terms and conditions and privacy policies.
5. Screenshot folder: Opens the screenshot folder containing screenshots you’ve taken with Diorama Studio.
6. Options settings: Set various options (see below) for both Diorama Studio and Battle Rondo.
7. Quit: Quits launcher.
ShinkiNET Launcher options settings
Clicking on the ShinkiNET Launcher options settings will bring this up:
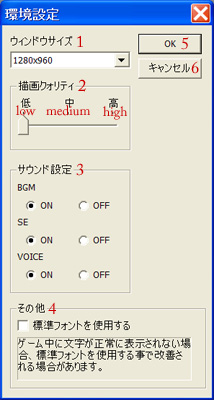
1. Sets window size of ShinkiNET applications.
2. Sets the graphics quality of the 3D models and backgrounds.
3. Activate or disable sound for background music (BGM), sound effects (SE) and voice.
4 Use standard fonts: check this setting if the fonts in Battle Rondo aren’t displaying as usual. (This option has no bearing on whether you see Japanese text correctly.)
5. OK: Accepts all changes to settings.
6. Cancel: Cancels all changes to settings.
Diorama Studio
There’s no way of launching the Diorama Studio executable, dstudio.exe, directly. You will have to launch the program through the ShinkiNET Launcher. The program will check for updates online whenever it is executed. (The first time I ran it, it took me three and a half hours to download all the updates.) Once you’ve completed the update process, you will see this screen:
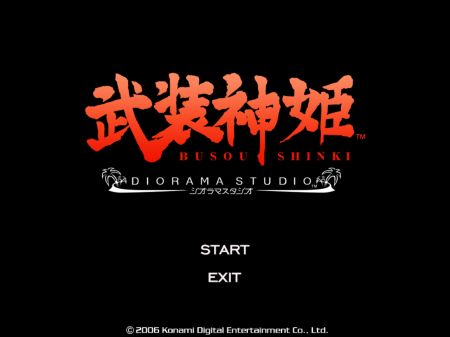
Click on Start and you’ll see this:
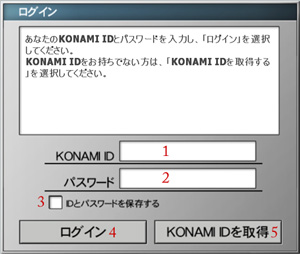
You will now have to key in your Konami ID (1) and password (2). Click on the check box (3) to save the logon and password in order to avoid keying them in every time you use the program. Click on the Login button (4) to log into Konami’s server. The final button (5) loads the Konami ID registration page in the default browser in case you need to create a Konami ID.
Once you’ve logged on, you’ll see this:
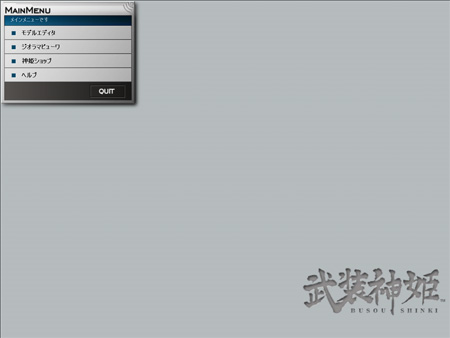
You’re now ready to play with your virtual action figures and create your own digital dioramas. I’ll post a simple guide for using Diorama Studio in another entry.

How do I uninstall it?? I can’t find any file that says uninstall… I tried just deleting but that didnt work….
Meimi132, I have to apologise for the late reply. And a rather unhelpful reply at that.
I’ve yet to uninstall the ShinkiNet suite myself but I would suggest going into Windows’ Control Panel, selecting the Add or Remove Programs option and uninstalling the Busou Shinki software from there. You may have to first switch Windows to the Japanese language.
How do i uninstall this damn program????
I already switched to japanese language in windows XP
Using the Add/Remove programs din work because its displays some retry ignore abort message
And yah, how do i fix the Mess caused by this program???
It made my hard disk addresses into something like this ~ C:¥Documents and Settings
Oh never mind, I was somehow able to remove the files using a registry cleaner and resetting the unicode settings