Konami has recently changed the Konami ID registration process so this guide is no longer valid. Please see my new guide.
I’ve been so impressed by Konami’s Diorama Studio software for the Busou Shinki toyline that I’ve decided to put together a few guides for installing and using the program. These simple guides are aimed at non-Japanese Busou Shinki fans who are keen on using the program but who are perhaps a little intimidated by the fact it’s in a foreign language.
Both Diorama Studio and Battle Rondo (Busou Shinki’s online game component) share the same installer and launcher. Before you can use either, though, you will first have to create a Konami ID and install the client software.
This guide will only detail the steps you need to create your own Konami ID.
Creating a Konami ID is free but the entire process is in Japanese. Both lcpeng and Sheep have created walkthroughs and I referred to both while registering for a Konami ID myself. I thought I’d document the process myself and add graphics just to make the process even simpler.
Step by step
To create a Konami ID, head to this page where you should see this screen:
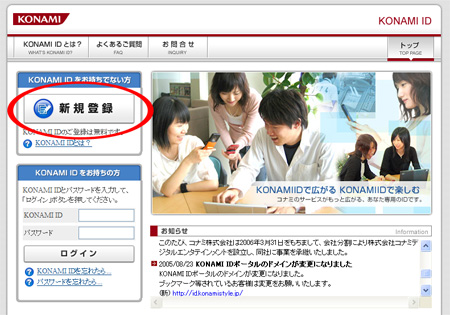
Click on the button I’ve circled in red. You should now see this screen:

This lists the various software which make use of a Konami ID. Click on the button I’ve circled in red to go to this screen:
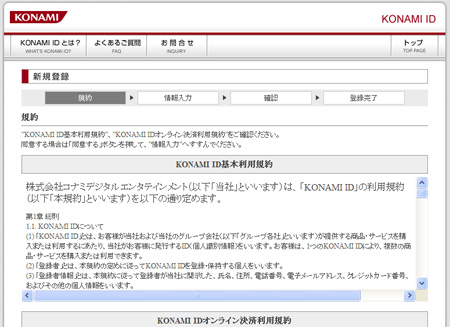
These are the various terms and conditions for the Konami ID. Scroll down until you see this:
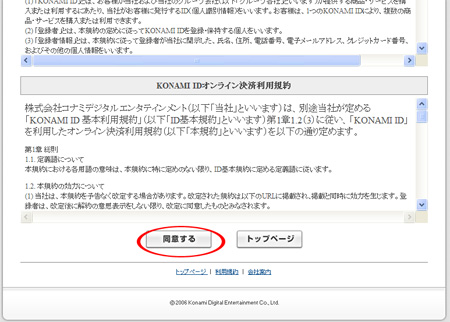
Click on the button circled in red to continue.
You should now see this screen:
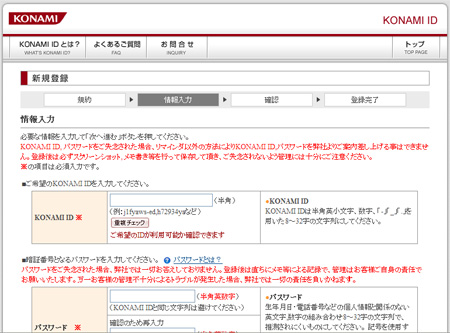
Here’s where you input all the following details:
- Konami ID
- Password
- Password reset question
- Name
- Gender
- Birthdate
- Japanese postcode
Let’s go through those one by one.
Konami ID

First, input your desired Konami ID. This is a text input box which requires a minimum of 8 alphanumeric characters and a maximum of 32 characters. You may use English text for this. Click on the pink button just below the text input field to check whether your desired Konami ID is available for use.
Password
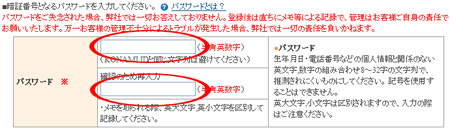
Next, key in your desired password. This needs to be between 8 and 32 alphanumeric characters long and this is case-sensitive. Again, this may be in English. The password shoudn’t be the same character string as your Konami ID. The second text input box is for you to input your password again to confirm it.
Secret question
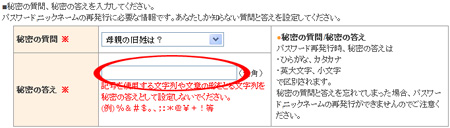
Now you have to select a secret question and provide an answer to confirm your identity in case you lose your password. There are five questions altogether in the drop-down list and you will have to select one and provide an answer in Japanese. Note that if you cannot provide the correct answer when you’re prompted with this secret question, you will not be able to retrieve your password.
I would recommend leaving the secret question field at the default setting (“What is your mother’s maiden name?”). To translate your mother’s maiden name into Japanese, head to this site. Input the name in the text input box marked “Romaji”, hit the “Convert” button and copy the translated name in either hiragana or katakana into the text input box for the answer to your secret question.
Or you may simply copy and paste some Japanese text into the answer field. I wouldn’t recommend doing that, though, since it would cause problems if you do happen to forget your password.
E-mail
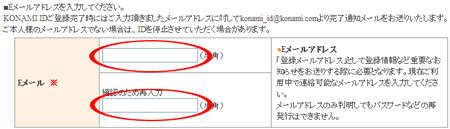
Key in your e-mail address twice. Be sure to submit a working e-mail address.
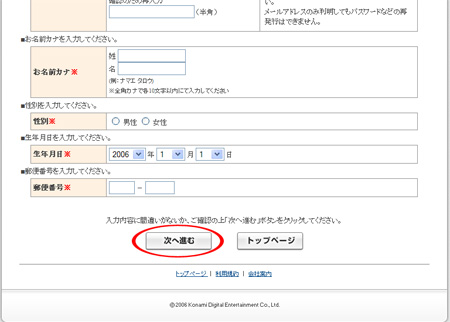
Name

Key in your name in the text input boxes. The top box is for your last name and the bottom box is for your first name. This has to be in Japanese. Again, go to this site to translate your name into Japanese then copy and paste it in the appropriate boxes.
Gender

Select one of the radio buttons for your gender.
Birthdate

Select the year, month and day of your birthdate from the drop-down lists.
Postcode

Provide a Japanese postcode. The left text input box takes three digits while the right text input box takes four digits. I used HobbyLink Japan’s postcode, “374-0075”.
I felt a little uncomfortable about doing this since it was obvious Konami is trying to verify whether you’re Japanese but I rationalised it to myself thusly: no one asked me for a Japanese postcode when I bought the Busou Shinki action figures and I figure I’ve earned the right to use the software just as much as any Japanese fan.
Once you’re filled in all those details, scroll down until you see this button circled in red:
Click on that and you should see a confirmation page. You should click on the button on the left (if I’m not mistaken) and you will have completed the process of creating your Konami ID. This Konami ID and password can now be used for both Diorama Studio and Battle Rondo.
In my next guide, I’ll walk you through the process of displaying Japanese text in Diorama Studio on a non-Japanese Windows XP system.
Feel free to let me know if you have any corrections or need further clarification.

sorry to buder you but there changing the side again must? konami id and game id please help when you can.
mfg max